LINUX基础操作(PHP版)
ssh - Secure Shell
安全外壳协议(安全的远程连接)
1.服务器端配置安装:
- 安装:
yum install openssh -server - 启动:
service sshd start - 设置开机运行:
chkconfig sshd on
查看启动服务:
ps -ef|grep ssh
2.客户端配置:
Windows: XShell/Putty
Linux: yum install openssh-clients
3.ssh使用
ssh 用户名@IP地址(22端口)
4.SSH config配置
存放路径: ~/.ssh/config
1 | 多用户分配 |
IdentityFile ~/.ssh/id_rsa.pub
IdentitiesOnly yes
效果: ssh laowang直接登录
5.SSH安全免密登录(ssh key)
公钥公开, 私钥保存本地~/.ssh/authorized_key
若服务器上已有该文件 , 将公钥文件内容添加至服务器文件即可
生成:
ssh-keygen -t rsa
ssh-keygen -t dsa
添加配置私钥至ssh服务(本地linux端)
ssh-add ~/.ssh/naxx_rsa
6.SSH端口安全
修改服务端口
文件路径/etc/ssh/sshd_config
1.vim /etc/ssh/sshd_config
2.修改port
Linux常用命令:
1.软件操作命令
软件包-yum
安装: yum install xxx
卸载:yum remove xxx
搜索:yum search xxx
清理缓存:yum clean packages
已安装列表:yum list
软件包信息:yum info xxx
2.服务器资源命令
内存大小:free -m
磁盘大小:df -h
分区信息:fdisk -lu
负载:w/top (一般0.6~0.7)
cpu个数和核数:cat /proc/cpuinfo
3.文件/文件夹操作
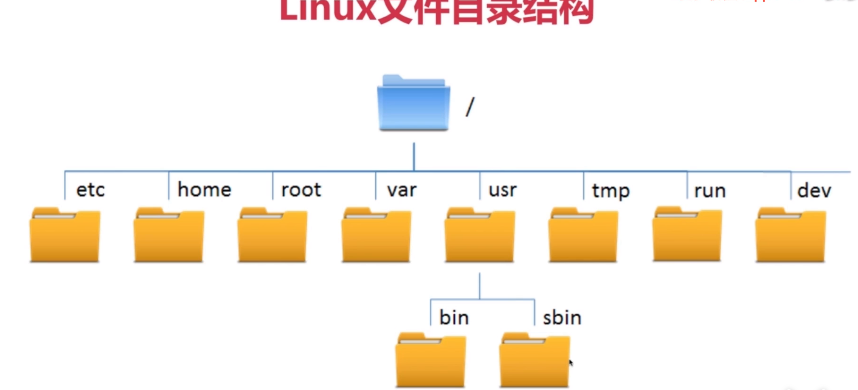
1).文件目录结构
1 | - 根目录`/` |
2).基本操作命令
- 查看目录下文件:ls -al
- 新建文件:touch
- 新建文件夹:mkdir -p
- 进入目录:cd
- 删除文件/目录:rm
- 复制:cp
- 移动/剪切:mv
- 显示路径:pwd
3).文本编辑Vim
1 | - 插入模式编辑`i` |
4).文件权限421
| r | w | x |
|---|---|---|
| 读-read | 写-write | 执行-execute |
| 4 | 2 | 1 |
更改权限chmod -R 777 runtime/
更改文件所有者 :
sudo chown -R naxx:naxx /data/test.txt
5).搜索/查找/读取
1 | - 从文件尾部开始读:`tail` `tail -f xxx` |
6).文件压缩/解压
tar
1 | - 压缩:`tar -cf naxx.tar 文件名` `.gz格式压缩:tar -czvf naxx.tar.gz 文件名 ` |
4.系统用户操作
1.添加用户 useradd 用户名
2.添加用户adduser 用户名
1 | > 区别:(Ubuntu) |
3.删除用户userdel -r 用户名 (同时删除用户文件夹)
4.设置密码passwd 用户名
5.防火墙设置
1 | > 保护服务器安全/设置规则/关闭防火墙 |
1.安装
yum install firewalld
2.启动
service firewalld start
3.检查状态
service firewalld status
4.关闭/禁用防火墙
service firewalld stop/disable
5.查看安装状态
yum list | grep firewall
6.查看服务状态
ps -ef | grep firewall
firewall-cmd 操作
6.提权及文件传输
1.提权: sudo
visudo
1 | - root账号登录: ssh root@192.168.1.xxx |
2.文件下载
wget / curl
1 | wget https://www.baidu.com/ -存为index.html |
3.文件上传
linux系统:scp
1 | - 以naxx账号的权限上传到/tmp目录:`scp test.txt naxx@192.168.1.xxx:/tmp/` |
Windows:lrzsz
1 | - 服务器安装`sudo yum install lrzsz` |
Apache
1.基本操作
安装: yum install httpd
启动: service httpd start
停止: service httpd stop
查看: ps -ef | grep http
端口: sudo netstat -anpl | grep http
2.文件目录
1.配置虚拟主机
1 | - /etc/httpd |
1 | 修改host `vim /etc/host` |
setenforce : 0-关闭selinux防火墙 1- 开启
2.伪静态:
mod_rewrite.so
conf文件中添加: LoadModule rewrite_module modules/mod_rewrite.so
Nginx
1.基本操作
安装
yum install -y nginx先添加资源库:
sudo rpm -Uvh http://nginx.org/packages/centos/7/noarch/RPMS/nginx-release-centos-7-0.el7.ngx.noarch.rpm启动
service nginx start停止
service nginx stop重载
service nginx reload(无缝重启动)安装完毕后/etc/nginx
2.扩展
1.虚拟主机
配置文件目录: /etc/nginx/conf.d/*.conf (具体查看nginx.conf)
cp default.conf.
1 | server{ |
Apache和Nginx不能同时运行, 默认端口都是80端口
2.多域名、多端口
1 | server{ |
3.伪静态
1 | server{ |
4.日志格式化
格式设置在 nginx.conf文件中
默认日志文件目录 : /var/log/nginx/access.log
单虚拟主机配置单日志: access_naxx_log /var/log/nginx/access.log 格式名;
1 | http{ |
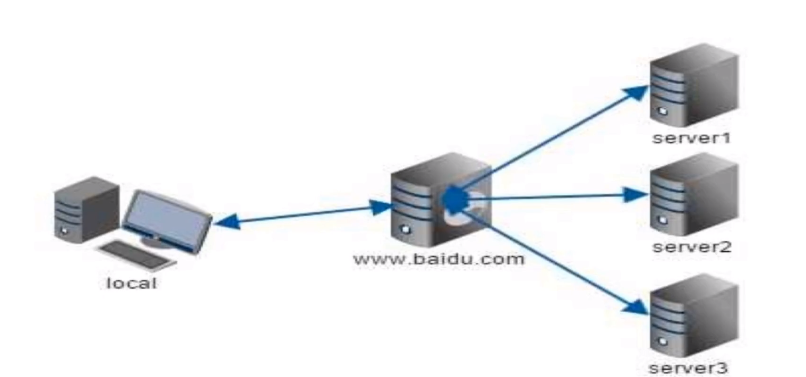
5.反向代理/负载均衡
1.原理
反向代理: 用户->Nginx服务器->真实资源服务器
负载均衡: 多服务器承载相同的请求
2.配置
1 | 文件路径: conf.d/naxx.conf |
6.调试技巧
单行调试功能
1 | add_header Content-Type "text/plain;charset=utf-8"; |
MySQL
1.基本操作
安装: yum install mysql-community-server
启动: service mysqld start/restart
停止: service mysql stop
2.MySQL安装
1 | -CentOS7默认安装mariadb数据库,先移除 |
下载 :
wget https://dev.mysql.com/get/mysql80-community-release-el7-3.noarch.rpm
3.扩展知识
1.远程连接
1 | 开启远程连接功能 |
2.开启Genelog
记录所有的数据库操作日志文件
1 | mysql> set global general_log_file="/tmp/geberal.log"; --设置保存位置 |
3.新建用户和权限操作
创建用户
1 | mysql> create user 'naxx'@'%' identified by '123123123'; |
密码策略改变(简单密码可用):
mysql> set global validate_password_policy=0;
mysql> set global validate_password_length=1;
赋予权限
1 | mysql> grant all privileges on *.* to 'naxx'@'%' identified by '123123123' with grand option; |
all privileges 代表所有权限, 可以使用’insert,select,update,delete’代替
回收权限
1 | mysql> revoke all privileges on *.* from naxx; |
4.忘记root密码
跳过密码验证
1 | - vim /etc/my.cnf |
4.MySQL客户端工具
SQLyog / Navicat / HeidiSQL / S-equal Pro / phpMyadmin
缓存服务
1.memcached
1.基本操作
安装:
yum install memcached启动:
memcached -d -l -m -pd:作为守护进程来运行
m:分配给Memcached的内存
l: Memcached监听的IP地址
p:Memcached监听的端口
u: 运行Memcached的用户
memcached -d -m 10 -u root -l 192. 168. 1. 130 -p 11211
停止:
kill pid
1 | telnet简介 |
2.常用命令
设置: set naxx 0 60 5
获取: get naxx
删除: delete naxx
退出: quit
2.redis
1.基本操作
安装:
源码编译安装wget 下载网址tar -xzvf redis.tar.gzmake(若gcc不存在,yum install gcc)make MALLOC=libcmake install命令 简介 redis-server Redis服务器端启动程序 redis-cli Redis客户端操作工具 redis-benchmark Redis性能测试工具 redis-check-aof 数据修复工具 redis-check-dump 检查导出工具 **默认端口: 6379 **
启动:
redis-server start/restart停止:
redis-server stop客户端:
redis-client
2.扩展知识
- redis支持多种类型的数据结构: list set hash string
- 支持数据备份, mster-slave模式的数据备份
- 数据持久化, 可以将内存中的数据保存在磁盘中, 重启的时候重载
3.命令
设置: set naxx hello
获取: get naxx
删除: del naxx
需要使用telnet链接 , 在服务器端redis-cli界面输入:
CONFIG SET protected-mode no, 即可
telnet 102.168.1.xxx 6379
还支持list ,hash ,set 等多种格式数据